Cookies on a Stick! (Toronto Bakes for Japan)
Here are one of the two baked items I have made for Toronto Bakes for Japan!
I’ve been wanting to make sugar cookies on a stick for FOREVER. They are just so cute and fun to eat!
That being said, only make cookies on a stick if you have lots and lots of time on your hands. These babies take forever, mostly because you can only bake about 5 of them at a time. And you have to be oh-so delicate when handling them. I had never had such a nerve-wraking baking experience, especially since these were not for me, but for a fundraiser.
With or without a stick though, these cookies are delicious! I up’ed the health factor by using whole wheat flour and egg whites and this adds a nice crunch. You’d almost think you were eating something good for you! (Minus the icing).
If you are making cookies on a stick, carefully insert the stick slowly by rotating the stick into the cookie with one hand, while holding the cookie down with the other hand.
I also found that I had to flip over the cookie and add a little extra dough to the back made the cookie more stable.
The icing recipe I used was adapted from Antonia74’s recipe, although I found that I did not need as much powdered icing sugar. You can use the original recipe, but this worked better for me.

Sugar Cookies
Ingredients:
Cookies
- 1/2 teaspoon salt
- 1 cup butter, softened
- 1 cup sugar
- 1 egg white (or 1 large egg)
- 2 tsp vanilla
Royal Icing
- 3/4 cup of warm water
- 5 Tablespoons meringue powder
- 1 teaspoon cream of tartar
- 1 bag (2kg) powdered icing sugar
Directions:
Cookies
- Whisk flour and salt in a bowl. In a separate bowl, mix butter and sugar together until fluffy.
- Add egg white and vanilla. On a low mixer setting, add flour mixture to butter mixture until well incorporated.
- Roll out dough on a flat surface and cut into shapes with a cookie cutter. (Hint, it’s easier to roll the dough and chill in the fridge for 15 minutes prior to cutting out the shapes).
- Bake in preheated oven for 12-16 minutes at 350*F until the cookies are golden around the edges.
Royal Icing
- Whisk the warm water and meringue powder together in a bowl for 30 seconds until frothy and thick.
- Add the cream of tartar and whisk by hand for another 30 seconds. Add all of the icing sugar and mix with a mixer on the lowest speed for 10 minutes, until nice and thick.
Cookie recipe adapted from Cookie Craft
Royal icing recipe adapted from Antonia74’s recipe
Here, you can tint the icing with different colour gels or thin the icing to outline and flood the cookies. I found that the icing was a good consistency to outline the cookies, but I did have to add a little bit of water to flood the cookies.
Also, don’t forget to keep the icing covered with plastic wrap or a damp tea towel, as it prevents the icing from crusting over.
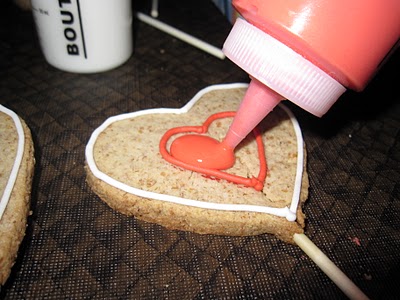
To make the heart in the middle, I used a smaller heart shaped cookie cutter and traced the shape with a Wilton’s foodwriter edible marker. This helped give me a guide of where to pipe my icing.
I find that squeeze bottles work best to create the “flood” of icing. They can be picked up at any craft or dollar store.
When the outline icing is dry, just fill and spread the icing with a toothpick to fill in the gaps and let dry on a flat surface for 24 hours. (Don’t worry, the icing will keep the cookies from drying out).
Have a great night everyone!







I LOVE the bright red! Your hearts in the center look so clean! Nice job!
These are lovely. I was going to attempt to make cookies on sticks, but I realized how few you can make at a time and laziness got the better of me.
Way to go!! These are so cute!!! Good cause to bake for!! High five girl!!! Gonna have to try to make cookies with Royal Icing! Have that project of my list!!